ASDM Basic Configuration Guide in GNS3
In this tutorial, we focus to deploying Cisco ASA firewall on GNS3. This configuration has been done in GNS3 0.8.3.1-all-in-one setup. In additionally, make sure to disable windows firewall on your computer.
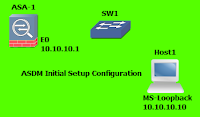
First of all, you need to open GNS3 and make the initial setup lab for ASA configuration. As basic employment, I have used following figure to launch the ASDM. You need to install MS-Loopback network adapter with 10.10.10.2/24 IP address and set the default gateway as 10.10.10.1/24. Connect the MS-Loopback host to SW1 and then connect that SW1 to ASA firewall. Here, I have used SolarWinds TFTP server to copy the asdm bin file to ASA firewall.
Configuration
ASA # configure terminal
# interface G 0
# ip address 10.10.10.1 255.255.255.0
# nameif inside
# no shutdown
# exit
Now, you can ping to ASA from your MS-Loopback and vice versa. Next part is the fun part. Let's see how to copy asdm bin file to ASA firewall.
# copy tftp://10.10.10.2/asdm-647.bin flash
# configure terminal
# asdm image flash:asdm-647.bin
# http server enable
# http 10.10.10.2 255.255.255.255 inside
# username itech password cisco privilege 15
Now, you have successfully configured the ASA to load ASDM. Type https://10.10.10.1 in your web browser. Then you can download the ASDM launcher to load the asdm. After downloading the ASDM launcher, install it in your computer.
Go to the installation location where C:Program Files, there you can see a Cisco folder, in that folder click on asdm-launcher. Use your credentials to log into asdm. If you need additional information, please visit ASDM Configuration Video Tutorial.
Cheers!


Post a Comment